4 Point Installation Instructions
 Step # 1:
Remove existing seat belt and hardware.
Step # 2:Wrap the lap belt portion around the front of the seat and bring the (A) and (B) ends to the back of the seat. Run the (C) End over the top of the seat to the back of the seat. If there is a headrest, run it between the 2 headrest posts.
(This seat belt will not work on seats that have a headrest that is continuous with the seat...all one piece. You must either be able to run the (C) End through the center or have no headrest at all.) If you have a continuous headrest as just mentioned, then you can use our
W-Jeep Seat Belt instead!
Step # 3:Now connect the (A) End to the existing anchor point using your original hex bolt or a new one purchased from Wesco. Then do the same with the (B) End. (The hex bolt should be firmly tightened)
 Important:
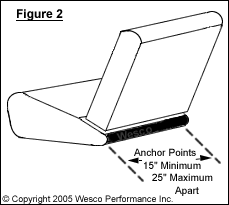
 If your vehicle does not have pre-existing anchor points (threaded holes) for the (A) and (B) Ends, such as vehicles older than 1962, then you must create them as is described for the (C) End in the next step below (Step # 4). If you are going to create your own anchorage points for the (A) and (B) Ends, then you should space them between 15-21 inches apart. See
Figure 2. You will also need to purchase our optional hardware kit which includes 3 each of: 7/16" fine thread grade 5 hex bolts, nuts and lock washers (or 3 lock nuts), and three 3" fender washers.
Click Here to view!
Step # 4:Next you must create an anchor point for the (C) End to connect to. Using a 1/2 inch drill bit, drill a hole half way between the anchorage points for the (A) and (B) Ends making sure that you don't drill into anything of importance that is below the floor board (avoid damaging exhaust system, brake or fuel lines). Once your hole is drilled, run you hex bolt through the hole in the (C) End and then through the hole that you just drilled. Using a second person under the car, slip the end of the hex bolt through the 3" fender washer and then screw on the lock nut. (The lock nut should be firmly tightened on the hex bolt)
An alternative to using the 3" fender washer and lock nut is to use our #10154
Mounting Plate which has a threaded hole and does not require a lock nut. If you like, you can permanently attach the mounting plate to the underside of the floor board.
Note: Some vehicles have an eye bolt mounted behind the back of the seat on the floor. These can be used instead of drilling a hole into the floor board, but you will need to purchase one of our
Snap Ends to add to the (C) End of the harness.
Step # 5:Now just use the length adjusters to snug up your new 4 point seat belt!
Safety Information:Mounting
1. Mounting hardware to the floor should always have metal-to-metal contact. You should avoid carpet, plastic or any other material between the fastener components and the floor which could tend to loosen over time.
2. All bolts used through NON-threaded holes must have either a lock-nut, lock washer or apply a thread locking compound for security.
3. Bolts used for mounting seatbelts should be a minimum size 7/16" diameter, Grade 5 product.
4. Anchor points for belts must meet the strength load requirements of FMVSS 210. When replacing belts, always use the anchorages provided by the vehicle, or seat manufacturer when available.
5. Do not connect both ends of this belt to the same, single mounting point.
 PROPER ADJUSTMENT:
The webbing (strap) should be threaded through the middle anchor fitting as shown in Figure 3. Adjust the length of the straps to fit the size range of various occupants. Leave at least 1" loose beyond the anchor slot.
Seat Belt Use
1. Always wear your seat belt when the vehicle is in operation.
2. Adjust and wear lap portion of the belt low and snug across your hips.
3. Each belt is intended to restrain only one person at a time. Do not put two people under one belt.
4. Never attempt to restrain a child in your lap using the restraint around both you and the child. The child could be severely injured or even killed in the event of a collision.
5. Seat Belts are matched sets. Do not mix or use this belt or parts of this belt with other types of seat belts.
Use and Maintenance Instructions
WARNING:
FAILURE TO PROPERLY INSTALL, USE, PERIODICALLY INSPECT AND MAINTAIN THIS SEAT BELT COULD LEAD TO SERIOUS INJURY OR DEATH! PLEASE FOLLOW ALL OF THE IMPORTANT INFORMATION BELOW:
Maintenance
1. Inspect belt regularly. If the assembly does not work properly or you find cuts, frayed or worn webbing the belt must be replaced.
2. More frequent inspections may be necessary if the belt is subjected to harsh treatment or extreme conditions.
3. Whenever a vehicle is involved in a collision you must replace every part of the seat belt system; both sides of the belt including the mounting hardware!
4. Clean with mild soap and water. Do not bleach or re-dye as it will tend to severely weaken the webbing.
Universal Installation Information:
If the vehicle is equipped with seat belt anchorages, these should be used in lieu of other methods.
CAUTION: DEATH OR SERIOUS INJURY COULD RESULT FROM NOT PROPERLY THREADING THE WEBBING THROUGH THE ADJUSTABLE END. MAINTAIN A MINIMUM OF ONE INCH WEBBING BEYOND THE ANCHOR. (SEE FIG. 3)
CAUTION: IF THE FIXED END OF A SEATBELT IS TOO LONG TO ALLOW A SNUG FIT ON A SMALL OCCUPANT, DO NOT USE THE BELT! YOU MUST SHORTEN THE BELT THROUGH THE ADJUSTABLE ANCHOR ENDS TO ALLOW A PROPER FIT.
AS A GENERAL RULE, CHILDREN WEIGHING LESS THAN 80 LBS SHOULD BE SECURED IN AN APPROVED CHILD SAFETY/BOOSTER SEAT ACCORDING TO MANUFACTURER'S RECOMMENDATIONS!!! |
|


